1 pineapple
1 head green leaf lettuce
4 lbs red grapes
2 lbs broccoli
4 avocados
1 cantaloupe
3 lb Utah gala apples
6 tomatoes
6 bananas
5 red potaotes
8 guava's
All for $16.50. See here for details. It will be 2 weeks before another pickup from Bountiful Baskets.
Saturday, October 31, 2009
Bountiful Baskets Coop October 31st
Beef Stroganoff
My husband dislikes this dish usually. And usually I make this with ground beef and in a past life from a box. There are thousands of recipes on how to make this dish and I've tried probably 999 of them. This one time I struck gold as my stroganoff hating husband loved this dish and asked for me to make it again. The flavors were quite good and melded together nicely. The recipe originally called for beef tenderloin but that's too pricey for me so I used round steak that I cut against the grain to make it more tender.
Beef Stroganoff
adapted from America's Test Kitchen Family Cookbook
salt
8 ounces egg noodles
3 tablespoons unsalted butter
2 tablespoons vegetable oil
12 ounces white button mushrooms, trimmed and halved
12 ounces round steak, cut into 1/8 inch strips against the grain
pepper
3/4 cup beef broth
1 onion, minced
1 1/2 teaspoons brown sugar
1 teaspoon tomato paste
1 tablespoon all-purpose flour
1/2 cup low-sodium chicken broth
1/3 cup sour cream
Bring 4 quarts water to a boil in a large pot. Add 1 tablespoon salt and the noodles and cook, stirring often, until they are almost tender but still firm to the bite. Drain the noodles, then return to the pot and toss with 2 tablespoons of the butter. Cover to keep warm.
Meanwhile, heat 1 tablespoon of the oil in a 12 inch skillet over medium high heat until shimmering. Add mushrooms and 1/4 teaspoon salt and cook until lightly browned, about 5 minutes, then transfer to a bowl.
Pat the beef dry with paper towels, then season with salt and pepper. Add the remaining 1 tablespoon oil to the skillet and return to medium high heat until just smoking. Brown the beef, about 5 minutes, then transfer to the bowl with the mushrooms.
Add 1/4 cup beef broth to the skillet and return to medium heat. Simmer, scraping up any browned bits, until syrupy, about 1 minute. Transfer the broth to the bowl with the mushrooms and beef.
Add remaining 1 tablespoon butter to the skillet and melt over medium heat. Add the onion, brown sugar, and tomatoe paste and cook until the onion is slightly browned, about 5 minutes. Stir in the flour and cook 1 minute. Whisk in the chicken broth and remaining 1/2 cup beef broth and simmer until thickened, about 2 minutes.
Add any accumulated juices from the mushrooms and beef. Stir about 1/2 cup of the sauce into the sour cream, then stir the sour cream mixture into the sauce. Add the mushrooms and beef and warm through. Season with salt and pepper to taste. Serve over the warmed buttered egg noodles.
Thursday, October 29, 2009
Sister Virginia's Daily Loaf
This bread ranks third after the Egg Harbor bread and the First Loaf as my favorite bread so far. I'd say this has been the favorite of the kids so far as they took a loaf to split between them. This is a fairly easy bread to bake and requires only a few ingredients. I have to admit I'm really having fun trying all the different types of bread. I am surprised at how different breads can taste just be altering directions or ingredients.
Sister Virginia's Daily Loaf
Bernard Clayton's New Complete Book of Breads
1 package dry yeast
1/4 cup warm water (105-115 degrees) , plus 1 cup water
1 cup milk
2 tablespoons sugar
2 teaspoons salt
4 tablespoons butter, room temperature
7 cups bread or all purpose flour
1/2 tablespoon butter, melted
2 medium loaf pans, greased
In a small bowl or cup dissolve the yeast in 1/2 cup warm water. Stir to dissolve and set aside. Warm the milk in a large saucepan and add the sugar, salt, and butter. Add one cup water. Pour in the yeast mixture and stir together with a large wooden spoon.
Pour in 3 cups flour and beat for 3 minutes with the flat beater on your mixer. The batter will be smooth. Continue adding flour, 1/2 cup at a time, working the dough until it cleans the sides and bottom of the bowl.
Knead 8 minutes with the dough hook on your mixer. Place dough in a greased bowl, cover tightly with plastic wrap, and leave at room temperature until it has doubled in bulk, about 1 hour.
Turn the dough out and knead briefly to press out any gas bubbles, and divide into 2 equal pieces. With your hands, press the ball of dough into an oblong piece the length of the pan. Fold lengthwise and pinch the seam together. Turn the dough over, seam down, and tuck in the ends. Drop into the prepared pan and push down with the fingers to fill the corners. Repeat with the second piece.
Cover the pans and leave until dough has doubled in bulk, the center slightly above the edge of the pan, about 1 hour.
Preheat oven to 350 degrees 20 minutes before baking.
Brush the dough with melted butter, and place on the lower oven shelf. Bake until the crust is a golden brown and the loaves are loose in their pans, about 40 minutes. Thump the bottom crust with the forefinger. A hard hollow sound means the bread is baked. The bottom crust will also be nicely browned.
Remove the bread from the oven and turn the loaves onto a metal cooling rack. This bread freezes well.
Wednesday, October 28, 2009
Funeral Potatoes
I think everyone in my state has tried these potatoes at least once. They are favorites of everyone I know. I'm not a huge fan of them mainly because they are loaded with cream of mushroom and chicken soup which I usually find pretty gross. Then I heard my favorite magazine was reworking the dish for their new cookbook I was excited. I have to say they did a pretty dang good job of turning the dish into something my husband would actually eat. See my husband is not from Utah and there are so many dishes that are favorites here that he just does not like. Funeral potatoes being one of the top items he does not like. However after trying this recipe he said I could make these once a year instead of the never again he usually says.
Funeral Potatoes
Best Lost Suppers Cookbook
4 pounds russet potatoes, scrubbed
2 tablespoons vegetable oil
1 pound white mushrooms, sliced thin
salt
1 onion, minced
2 tablespoons all-purpose flour
1 1/2 cups whole milk
1/2 teaspoon minced fresh thyme
1/2 teaspoon pepper
1 1/2 cups shredded sharp cheddar cheese
8 tablespoons (1 stick) unsalted butter
1 pound ham steak, cut into 2 inch matchsticks
1 cup sour cream
1 1/2 cups cornflakes, crushed fine
Adjust an oven rack to the middle position and heat the oven to 350 degrees. Grease a 13 by 9 inch baking dish and set aside.
Bring potatoes and 4 quarts water to a simmer in a large pot and cook until just shy of tender (a paring knife should glide through the flesh with slight resistance), 10 to 15 minutes. Drain the potatoes and set aside. When the potatoes are cool enough to handle, peel them, then grate the flesh lengthwise on the large holes of a box grater. Return the potatoes to the pot.
While potatoes cook, heat the oil in a large skillet over medium heat until shimmering. Add the mushrooms and 3/4 teaspoon salt and cook until the mushrooms have released their juices and are brown around the edges, 7 to 10 minutes. Add the onion and cook, stirring occasionally, until softened, 5 to 7 minutes. Stir in the flour and cook for 1 minute.
Whisk in the milk, thyme, and pepper, bring to a simmer, and cook, stirring frequently, until thickened slightly, about 1 minute. Stir in the cheese and 6 tablespoons butter and cook until melted, about 1 minute.
Off heat, stir in the ham and sour cream. Pour the mixture over the potatoes and toss to combine. Transfer the mixture to the prepared baking dish. Melt the remaining 2 tablespoons butter in a bowl in the microwave. Stir in the cornflakes, then sprinkle them evenly over the top of the potato mixture.
Place the baking dish on a foil-lined rimmed baking sheet and bake until the potatoes are bubbling and the top is golden brown, 35 to 45 minutes. Cool for 10 minutes before serving.
Monday, October 26, 2009
Buttermilk Bread
I'm having fun working my way through this bread book. I'm almost done working my way through the white breads and the whole wheat breads are coming up soon. I'm not doing every recipe in the book, just the ones that I know we will like. One thing I've learned is homemade bread does not last long in my house. It seems I'm baking bread about every 2-3 days. Store bought bread goes moldy long before we eat it all. Having said that my favorite white bread I've baked so far has been the Egg Harbor bread. This buttermilk bread comes in really close to the Egg Harbor bread. The flavor is quite good in this buttermilk bread with none of the funky after taste in the store bought buttermilk bread. This has been the favorite bread of my kids. Both loaves were gone in less than 24 hours with most eaten by the three of them.
Buttermilk Bread
adapted from Bernard Clayton's New Complete Book of Bread
5 to 5 1/2 cups bread or all purpose flour
3 tablespoons sugar
2 teaspoons salt
1/4 teaspoon baking soda
1 package dry yeast
1 cup water
1 cup buttermilk
1/3 butter (The cookbook called for shortening but I prefer butter to shortening)
1 egg, beaten
2 medium greased loaf pans
In a large mixing bowl stir together 2 cups flour, sugar, salt, baking soda, and yeast. In a saucepan combine the water, buttermilk, and butter and place over warm heat to warm. Warm until the butter melts. Because of the buttermilk the mixture may look curdled. Gradually add the liquid to the the dry ingredients and beat for 2 minutes with the flat beater on your mixer. Add one cup flour to make a thick batter and beat for 2 more minutes. Switch to a dough hook and work in the remaining 2 to 2 1/2 cups flour. Add the flour gradually, until the mass of dough is soft and not sticky.
Knead until the ball of dough is smooth and elastic-about 8 minutes. If the dough is slack and soft and has a tendency to stick add sprinkles of flour. It will pull away cleanly from the sides of the bowl when it has enough flour.
Place the dough in a greased bowl, cover tightly with plastic wrap and put in a warm place until the dough has doubled in bulk about one hour.
Punch the dough down and cut into 2 pieces. Turn the cut side under and gently press and pat the dough into an oblong shape that will fit tightly into the pan.
Cover with waxed paper and return to a warm place for about 45 minutes or until the dough has risen about 1 inch above the edge of the pan.
Preheat the oven to 375 degrees about 20 minutes before baking.
Bake for about 40 minutes or until the crust is golden brown and a loaf sounds hollow when thumped on the bottom. If the bottom is soft and the bread does not seem brown enough, return the loaf to the oven without the pan for another 5 to 10 minutes.
Place the loaves on wire racks to cool.
Sunday, October 25, 2009
Sausage Muffin
I love McDonald's sausage Mcmuffins. However I am sure their mcmuffin is loaded with ingredients I'd prefer to keep out of my family's diet. I used my homemade muffins for this but you could buy English muffins from the store. I buy the country sausage and shape it into patties myself but again you could buy the preformed sausage patties if you'd prefer. I freeze mine with everything but the egg. I make the egg while the muffin is defrosting in the microwave if the person who is eating it wants the egg. I prefer mine without the egg. These also make great late night snacks or even after school snacks.
1 English muffin, my recipe, toasted
1 slice cheddar cheese (you could use those American cheese slices if you like the processed stuff)
1 sausage patty, cooked
1 fried egg, if desired
Place cheese on muffin followed by sausage, and egg (if using). Serve.
To freeze, leave egg off, build as listed above and wrap in freezer paper then place in a sandwich bag.
Saturday, October 24, 2009
October CrossRoads Coop
Not too shabby for $14 for all the produce, bread, and lentils. The bratwursts were $3.25.
4 avocados
10 Utah Golden Delicious apples
9 pears
8 bananas
1 cabbage
1 2lb bag carrots
2 eggplant
1 3lb bag of organic Utah yellow onions
2 organic Utah spaghetti squash
1 lb lentils
Stone Ground's Artisan wheat loaf
To find out how to order click here.
Halloween Treats Part IV plus Giveaway Winners
First the winners of the tomato paste tubes:
Random Integer Generator
Here are your random numbers:
13 6
Timestamp: 2009-10-24 15:18:57 UTC
Number 6 is Frieda
Number 13 is Charmed
If you'd email your address at n_baron@msn.com I'll get them in the mail next week.
On to the treats! You can make these Halloween doughnut holes with holes you buy from the store or with the holes from the yeast filled doughnuts I posted here. If you buy the plain doughnut holes from the store you'll still need to make the glaze so you can roll the doughnut holes through them, color the glaze for a more Halloween feel if you'd like. After putting glaze on your doughnut holes roll them through Halloween candy sprinkles or colored sugar sprinkles. I put the finished doughnut holes on skewers to serve them to the kids.
Friday, October 23, 2009
Yeast Raised Glazed Doughnuts
Last chance to enter my giveaway for the tubes of tomato paste. 5pm tonight is the closing of the giveaway and I'll announce the winners tomorrow. Click here to enter.
My boys love doughnuts. They are always asking for a doughnut when we go to the store or drive past Krispy Kreme. I think the price of doughnuts are high and hate buying doughnuts. My husband usually treats them to a doughnut once a week or once every two weeks. However now that I've made my own I think our days of buying those overpriced doughnuts are over. These doughnuts barely last one hour in the house. They were that good. They really weren't hard to make. You can even start making these the night before and then refrigerate the dough for hot doughnuts in the morning. Just complete the recipe through the first rise the day before, then refrigerate the dough overnight, then roll, cut, and cook them in the morning.
Yeast-Raised Glazed Doughuts
King Arthur's Baking Companion
1/2 teaspoon salt
1/4 teaspoon nutmeg
1/4 cup (1 3/4 ounces) sugar
2 1/4 teaspoons instant yeast
3 cups (12 3/4 ounces) unbleached all purpose flour
1 large egg
1 cup (8 ounces) milk
2 tablespoons (1 ounce) butter, melted
1/2 teaspoon vanilla extract
6 cups (2 pounds) vegetable oil or shortening (2 1/2 pounds), for frying
Glaze
1/4 cup (2 ounces) milk
2 cups (8 ounces) confectioners' sugar
1/4 teaspoon vanilla extract
Whisk together the dry ingredients. In a seperate bowl, combine the egg, milk, butter, and vanilla and stir into the flour mixture, mixing until well combined. Let the dough rest for 5 minutes, then knead 6 to 8 minutes by hand or mixer until you have a smooth, soft dough. Place the dough in a buttered bowl, turn it over to grease the top, and let it rise; covered in a warm place for 1 1/2 to 2 hours, until doubled in bulk.
Deflate the dough and turn it onto a lightly floured surface. Gently roll the dough out to 1/4 inch thickness and cut with a round cutter (or, using a pizza wheel, cut into strips to make cruellers). Cover loosely with greased plastic wrap and let rise again for about 1 hour, until doubled again.
Place oil or shortening in a heavy pan or deep skillet and heat to 350 degrees. Place the doughnuts in the oil, two or three at a time, and fry until golden brown. Turn over and cook the second side. This should take no more than a minute for each side. Overcooking will make the doughnuts tough. Drain on paper towels.
To make the glaze, stir the milk into the confectioners' sugar until it is smooth, then add the vanilla.
When the doughnuts are cool enough to handle (but still warm), dip the tops of the doughnuts in the glaze, then place on a rack or plate to let the glaze drop down.
Thursday, October 22, 2009
Pork Chops with Hoisin-Molasses Barbecue Sauce
This recipe has a little of something for pretty much everyone. It's quick and easy to make. It's great for those watching calories and it was very tasty. I served it with white rice and the nutritional info that I'll post is from white rice but I think this would have been good with brown rice too. The sauce was a little spicy for my kids but they are not fans of anything with any type of spice to it plus I think the majority of the spice was the Chinese mustard I had which is very spicy.
Nutritional info:
1 pork chop and 1/2 cup rice is one serving size
317 calories
7.7 gram fat (sat 2.2, mono 3.4)
protein 23.9 g
carbs 35.8 g
fiber 0.8g
chol 58mg
iron 2mg
sodium 478 mg
calc 49mg
And just a reminder if you have not entered the giveaway for the tomato paste click here.
Pork Chops with Hoisin-Molasses Barbecue Sauce
Cooking Light Magazine March 2008
3 tablespoons sugar
1 tablespoon molasses
3 tablespoons Hoisin sauce
1 tablespoon rice vinegar
1 tablespoon low sodium soy sauce
2 garlic cloves, minced
2 teaspoons Chinese hot mustard
cooking spray
1/2 teaspoon salt, divided
1/4 teaspoon pepper
6 (4 ounce) boneless center-cut loin pork chops, about 1/2 inch thick
4 green onions
3 cups hot cooked white rice
Combine sugar and molasses in a small heavy saucepan over medium heat. Cook 3 minutes or until sugar melts, stirring occasionally. Stir in hoisin sauce, vinegar, 1 tablespoon soy sauce, and garlic; bring to a boil. Cook 5 minutes or until slightly thickened, stirring frequently. Remove from heat; stir in mustard. Keep warm.
Heat a grill pan over medium high heat. Coat pan with cooking spray. Sprinkle 1/4 teaspoon salt and 1/4 teaspoon black pepper over pork. Add pork to pan; cook for 2 minutes on each side or until done. Add pork to hoisin mixture, turning to coat. Keep warm.
Add onions to pan; cook 2 minutes or until wilted. Remove onions from pan, chop. Combine onions, the remaining 1/4 teaspoon salt, and rice; serve with pork.
Wednesday, October 21, 2009
English Muffins
First off if you haven't entered the giveaway for the tomato paste tubes click here for the details. Contest runs through Friday.
We don't eat English muffins a lot in our house and even when we plan to eat muffins I seem to forget to buy them. Adding to the fact that there are lots of chemicals in the store bought kind I decided to give my hand at making some. The recipe says to cook them then wait a day to eat them. I highly recommend you do that. Mine were gummy the first day but the second day they were just right. These do freeze well and I did freeze some for future use. I did not have English muffin rings so I shaped the muffins by hand. Not a perfect job but fairly close.
English Muffins
King Arthur's Bakers Companion
Starter
1 1/2 cups (6 1/4 ounces) unbleached all purpose flour
3/4 cup (6 ounces) water
1/8 teaspoon yeast
Mix all the starter ingredients in a medium sized bowl to form a smooth batter. Cover and leave at room temperature for at least 4 hours, or up to 16 hours. The starter should be puffy and full of holes when it's ready to use.
Dough
1 3/4 cups (7 1/4 ounce) unbleached all purpose flour
2 tablespoons (1/2 ounce) cornstarch
1 teaspoon instant yeast
1 teaspoon salt
2 tablespoons (7/8 ounce) sugar or non-diastatic malt powder
2 teaspoons baking powder
2 tablespoons (1 ounce) butter, melted
3/4 cup (6 ounces) milk, warm
1 to 2 tablespoons cornmeal for sprinkling on the pan
In a large mixing bowl, beat together the starter and all the dough ingredients, except the cornmeal, to form a smooth batter. The batter needs to be beaten for 5 to 8 minutes. Cover the bowl and place in a warm spot until the batter has doubled in size, about 1 hour.
Lightly grease 10 to 12 English muffin rings and place the rings on a lightly greased or parchment lined baking sheet that's already been sprinkled with a small amount of cornmeal. If you don't have English muffin rings, simply drop the batter onto the pan and shape it with your fingers. The muffin won't be perfect but will taste just fine.
Stir the dough, then drop a scant 1/4 cup dough into each ring. Sprinkle lightly with cornmeal. Smooth the dough, if desired, with your fingers, dipped in water first. Cover the pan and place in a warm place to rise for 1 hour, or until muffins have grown by at least a third.
Preheat the oven to 350 degree. Bake the muffins for 25 minutes, until they're lightly browned on both sides. The muffins may be forked split and eaten immediately (they'll be soft) or, for crunchier muffins, cool them completely, split them and toast.
Tuesday, October 20, 2009
Beef and Vegetable Soup plus a Giveaway Winners announced
First the giveaway. I've discovered this really package of tomato paste that is great for those recipes that only call for a teaspoon or tablespoon of tomato paste. You just store in the fridge after opening and its good for a few months. No more opening a can of tomato paste and then forgetting to use the rest of the can. This is made by Amore products and has become a favorite of mine. I hope you'll enjoy using it too. Just leave a comment if you'd like a chance to win one of two packages. If your a follower leave two comments for an extra chance and if your not a follower yet become one and let me know in a separate comment for two chances to win. You have until Friday at 5pm (MST) to enter and winners will be announced Saturday.
Winners are:
he winners of the tomato paste tubes:
Random Integer Generator
Here are your random numbers:
13 6
Timestamp: 2009-10-24 15:18:57 UTC
Number 6 is Frieda
Number 13 is Charmed
If you'd email your address at n_baron@msn.com I'll get them in the mail next week.
Now on to the soup. This had great flavor and was a favorite amongst everyone in our house. The depth of flavor was unbelievable. This is not a quick soup dish but not as long as some soup recipes. Next time I plan on adding some barely to the soup as I think that would really add to the dish.
Beef and Vegetable Soup
Cooks Country Dec./Jan. 2006
Broth
3 pounds beef blade steaks
salt and pepper
2 tablespoons vegetable oil
1 tablespoon tomato paste
4 cups low sodium chicken broth
4 cups low sodium beef broth
2 cups water
1 garlic head, top third cut off and discarded, loose outer skins removed
2 bay leaves
1/2 teaspoon dried thyme
Soup
1 tablespoon butter
1 medium onion, chopped
2 medium carrots, peeled, halved lengthwise and cut into 1/4 inch half moons
1 (14.5 ounce) can diced tomatoes, drained
salt and pepper
chopped fresh parsley
For the broth
Season blade steaks with salt and pepper. Heat 1 tablespoon oil in dutch oven over medium high heat until shimmering. Add half of steaks and cook until well browned on both sides, about 8 minutes. Set steaks aside on plate. Repeat with remaining tablespoon oil and steaks.
Pour fat from dutch oven and return to medium high heat. Add tomato paste and cook, mashing paste with wooden spoon for 30 seconds. Add chicken broth, beef broth, and water, and scrape browned bits from bottom of pot with wooden spoon. Return steaks and any accumulated juices to pot. Add garlic, bay leaves, and thyme and bring to a simmer, using a wide, shallow spoon to skim off foam or fat that rises to surface. Reduce heat to medium-low and simmer gently until meat is tender, about 2 hours.
Transfer steaks and garlic head to a rimmed plate to cool. Once cool enough to handle shred meat into bite sized pieces, discarding any fat. Using tongs, squeeze garlic cloves into small bowl. Mash with fork until paste forms. Pour broth through fine-mesh strainer. Return shredded beef and garlic paste to broth. Broth can be refrigerated for 3 days or frozen for 2 months.
For the Soup
Melt butter in clean dutch oven over medium heat. Add onion and carrots and cook until onion is softened but not browned, about 5 minutes. Add tomatoes and carrots. Bring to simmer, reduce heat to medium-low, and cook until carrots are tender, about 20 minutes.
To serve, adjust servings with salt and pepper and sprinkle with parsley.
You can add other veggies or replace the veggies listed with others. Just adjust cooking times as needed.
Monday, October 19, 2009
English Muffin Bread
My dad loves English muffin bread and since he's recovering from surgery I thought make him a batch. This bread really was not hard to make but it was a pain in the butt getting it into the baking pans. The dough is so sticky it does not want to release from anything. Not sure if there is anything you can do about that though. In the picture there are brown streaks which are due to using baking soda in the recipe. The streaks don't change the taste just make it less attractive. You can use baking powder in place of the baking soda if you'd prefer a loaf without the streaks.
English Muffin Bread
Bernard Clayton's New Complete Book of Breads
1 package dry yeast
1/2 cup nonfat dry milk
2 teaspoons salt
4 cups bread flour
2 cups hot water (120-130 degrees)
1/2 teaspoon baking soda dissolved in 1 tablespoon warm water
Grease two small loaf pans.
In a bowl combine the yeast, dry milk, salt and 2 cups flour. Pour in the hot water and stir to blend thoroughly. Stir in additional flour, 1/2 cup at a time, until the batter is thick. Stir the batter for 3 minutes with a flat beater in the mixer. The dough will pull away from the sides of the bowl in thick ribbons.
Cover the bowl with plastic wrap and put in a warm place (80-100 degrees) for about 1 hour, or until the batter has doubled in volume-it will be quite bubbly.
Stir down the batterlike dough and add the dissolved baking soda. Be certain it is well blended. Spoon or pour into the pans, pushing the dough into the corners with a rubber spatula. The pans will be about 2/3rds full.
Lay plastic wrap over the pans and return to a warm place. The dough will rise to the edge of the pans, about 1 hour.
Preheat the oven to 375 degrees 20 minutes before baking.
Bake the loaves for about 1 hour. The loaves will be well browned and pull away from the sides of the pan when done.
Turn the bread out from the pans. Allow to cool on a wire rack before cutting. The loaves can be kept for several months in a 0 degree freezer.
Saturday, October 17, 2009
Crispy Chicken Wraps
I finally got around to making this delightful little wraps after having the recipe for over a year. This makes a very quick meal if you use leftover chicken or a rotisserie chicken from the store. I used some sauteed chicken breasts to make mine. I originally saw the recipe in an issue of Cook's Country magazine (does this surprise anyone that I made yet another recipe from Cook's Country?) but I used Melanie's version from My Kitchen Cafe. Give this quick dish a try you won't be disappointed.
Crispy Chicken Wraps
Melanie at My Kitchen Cafe
**To prevent the wraps from unrolling during cooking, be sure to start them seam-side down in step 3.
1/3 cup mayonnaise, light or regular
1/4 cup chopped fresh cilantro
3 scallions, sliced very thin
2 celery ribs, chopped fine
2 tablespoons sour cream, light or regular
2 teaspoons hot sauce (this does not make them spicy but adds great flavor!)
1 rotisserie chicken, skin discarded, meat shredded into bite-sized pieces (about 3 cups)
2 cups shredded cheddar cheese
4 (12-inch) flour tortillas
1. Whisk the mayonnaise, cilantro, scallions, celery, sour cream and hot sauce in a large bowl. Add chicken and toss to combine.
2. Sprinkle cheese over tortillas, leaving 1/2-inch border around edges, then arrange chicken mixture down the center of each tortilla. Roll stuffed tortillas, leaving edges open. Spray the tortillas all over with cooking spray.
3. Heat a large non-stick skillet (or griddle) over medium heat for 1 minute. Arrange 2 wraps, seam-side down, in pan and cook until golden brown and crisp, about 2-3 minutes per side. Transfer to a plate and repeat with remaining wraps. Serve.
Friday, October 16, 2009
Cheddar Garlic Biscuits
I love homemade biscuits. I really can not stomach the taste of the canned biscuits you can buy in the grocery store. However I realize that I don't have the time to make homemade biscuits all the time. This recipe though is really quick to make and pairs well with a lot of dishes. From start to finish it takes about 30 minutes. I did sub evaporated milk for the cream, mainly because I did not have cream on hand and second to cut a few calories.
Cheddar Garlic Biscuits
adapted from Cooks Country Dec./Jan. 2006
2 cups all purpose flour
2 teaspoons sugar
2 teaspoons baking powder
1/2 teaspoon salt
3/4 cup cheddar cheese
2 minced garlic cloves
1 1/2 cups cream or evaporated milk
Adjust oven to upper middle position and heat oven to 425 degrees. Line baking sheet with parchment paper.
Whisk flour, sugar, baking powder, salt and garlic in medium bowl. Stir in 1/2 cup cheese. Add 1 1/4 cups cream and stir with wooden spoon until dough forms, about 30 seconds. Transfer dough from bowl to countertop, leaving dry, floury bits in bowl. In 1 tablespoon increments, add up to 1/4 cup cream to dry bits in bowl, mixing with wooden spoon after each addition, until moistened. Add moistened bits to rest of dough and knead by hand until smooth, about 30 seconds.
Pat dough into 8 inch circle, cut into eight wedges, and place on prepared baking sheet. Bake until just beginning to brown, 7 to 9 minutes. Remove baking sheet from oven, sprinkle 1 1/2 teaspoons remaining cheese on each biscuit, and return to oven, rotating baking sheet from front to back. Bake until golden brown and cheese topping has melted, 7 to 9 minutes. Serve warm.
Thursday, October 15, 2009
Acorn Squash with Brown Sugar Butter Sauce
Every year we get acorn squash with our CSA and every year I donate it to the food bank or a neighbor or I throw it away. This year I've received three so far and have decided I don't want to throw it away so I searched the internet and my cookbooks for a recipe. Most of the recipes call for you to stuff the squash with rice and sausage which for some reason did not sound too appealing to me. I ended up finding a recipe that made the squash a lot like a loaded sweet potato. I will admit I ended up really liking the squash and will make this again. The flavors blended well together and the squash was tender. As you can tell from the picture I ended up with a nice amount of buttery liquid so you may want to cut back on the butter some if you want to cut some calories. I'm not sure why I had so much liquid when the blog I found the recipe on did not have this problem.
Acorn Squash with Brown Sugar Butter Sauce
Savory Sweet Life
1 acorn squash, cut in half with seeds removed
1/2 cup water
a couple pinches of salt
a couple pinches of nutmeg
a couple pinches of cinnamon
2 – 1 Tablespoon pats of butter
4-6 Tablespoons brown sugar
DIRECTIONS:
Preheat oven on HIGH-Broiler. Pour water in a microwavable casserole dish large enough to accommodate the squash. Place the acorn squash flesh side down in the dish and microwave for 15 minutes. Remove from microwave carefully because the dish will be hot. Remove the acorn squash and transfer to a baking sheet with the flesh side facing up. Place a small pat of butter in each half and rub the entire flesh sided surface. Any remaining butter should be left in the middle of the squash. Sprinkle the squash with salt, nutmeg, and cinnamon. Finally sprinkle between 2-3 Tablespoons of brown sugar around the rim of the squash and allow the remaining sugar to join the butter in the center (This will be your brown sugar sauce). Broil on high heat for 5 minutes. You should seam some the rim of the squash with caramelization. If not, broil for an additional 3 minutes. Remove from heat and enjoy!
**Note: This recipe is not overly sweet or spicy. The sugar and spices merely enhance the wonderful natural flavor of the squash. If you prefer a more sweet and spicy acorn squash just add more according to your liking.
Wednesday, October 14, 2009
Blue Cheese and Cheddar Scalloped Potatoes
I've had some blue cheese sitting in the fridge for a few weeks and I had been trying to decide what to use it for when Melanie posted this recipe. I really liked how the blue cheese added to the dish. An added bonus was the flavor was there but it was not overpowering. In fact my husband did not notice that I had added blue cheese to the dish until I told him. I also subbed evaporated milk for the cream in this dish and no one noticed. Lately I've been playing with using evaporated milk in place of whipping cream as a way to cut calories in dishes with great success.
Blue Cheese and Cheddar Scalloped Potatoes
Melanie at My Kitchen Cafe
1 tablespoon butter
1 1/4 pounds russet or yukon gold potatoes, peeled and sliced 1/8-inch thick
1/2 medium onion, minced
2 cloves garlic, minced
1 teaspoon dried thyme
1/2 cup chicken broth
1/2 cup heavy cream **I used evaporated milk
1 bay leaf
1 cup grated sharp cheddar cheese
1/4 cup crumbled blue cheese (or more to taste)
Salt and pepper
Preheat the oven to 425 degrees. Heat a large cast iron skillet over medium-high heat. Add the butter. When melted, add the onion, cook for 2-3 minutes until translucent and beginning to lightly brown.
Toss in the garlic and thyme and cook for 30 seconds, until fragrant. Add a pinch of salt and pepper. Dump in the potatoes, chicken broth, cream and bay leaf. Bring to a simmer and then cover, reduce the heat to medium-low and cook for about 10 minutes.
Remove the cover, sprinkle the cheese on top, and place the iron skillet in the oven. Cook for 15 minutes or until the cheese is bubbling and slightly browned. Let rest for 5-10 mintues before serving. Season with salt and pepper to taste.
Tuesday, October 13, 2009
Simple Sesame Noodles
Seriously I am addicted to these noodles. I had them twice last week and for lunch and dinner yesterday. They take less than 15 minutes to make and they taste great. This recipe does contain a few ingredients that you may not have stocked in your pantry yet but once you try these you'll be keeping them stocked so you can make this simple dish. The best thing about this recipe is you can adapt the seasonings to your taste easily.
Simple Sesame Noodles
Pioneer Woman
12 ounces thin noodles, cooked and drained (angel hair, thin spaghetti, or Asian style)
1/4 cup soy sauce
2 tablespoons sugar
3 to 4 cloves garlic, minced
2 tablespoons rice vinegar
2 to 3 tablespoons pure sesame oil
1/2 teaspoon hot chile oil (more to taste) *** I used the red chili garlic sauce in place of the hot chile oil
4 to 5 tablespoons canola oil
2 tablespoons hot water
3 to 4 green onions, sliced thin
Whisk all ingredients (except noodles and green onions) together in a bowl. Taste and adjust ingredients as needed.
Pour sauce over warm noodles and toss to coat.
Sprinkle with green onions and toss.
Serve in a bowl with chopsticks. Yummy!
Monday, October 12, 2009
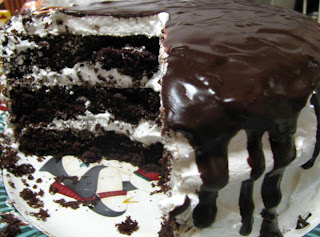
Chocolate Shadow Cake
This was a fun cake to make. To save time you could use a boxed cake mix but I have to tell you making a cake from scratch tastes much better. This would also make a fun cake to serve around Halloween time.
Chocolate Shadow Cake
Cooks Country Oct/Nov 2008
For this cake you will need:
4 large egg whites
3 tablespoons water
1 1/4 cup sugar
1 teaspoon cream of tartar
pinch of salt
1 teaspoon vanilla
3 (8 inch) chocolate cake rounds
4 ounces bittersweet chocolate, chopped
4 tablespoons unsalted butter
2 tablespoons light corn syrup
For the icing:
Whisk egg whites, water, sugar, cream of tartar, and salt in a large heat resistant bowl set over medium saucepan filled with 1/2 inch of barely simmering water (don't let the bowl touch water). With hand held mixer on medium high speed, carefully beat egg white mixture to stiff peaks, 6 to 8 minutes. Remove bowl from heat, add vanilla, and continue to beat until icing is very thick and stiff and cooled to room temperature, about 8 minutes.
To assemble:
Spread 1 cup icing on bottom cake layer. Repeat with second cake layer and additional one cup icing. Top with final cake layer and spread top and sides with remaining icing.
To decorate:
Place chocolate, butter, and corn syrup in large heat resistant bowl set over medium saucepan filled with 1/2 inch of barely simmering water (do not let bowl touch water). Stir until melted and smooth, then remove from heat and let cool 5 minutes. Spoon 1/4 cup chocolate mixture over top of cake and then drizzle remaining glaze along top edge of cake, allowing it to drip about halfway down the sides.
Sunday, October 11, 2009
Baked Steak Fries
I love making these just to snack on and they are great as a side dish. They don't take a lot of time to make and even the kids gobble these up. These are just as crispy as a fried french fry but much healthier for you.
Preheat oven to 425 degrees.
Spray a cooking sheet with Pam.
Wash and scrub 3-4 potatoes, I prefer red or yukon but russets work too
Cut the potatoes in half. Then cut into slices about 1/4 inch thick. Place on cooking sheet.
Cook for about 10 minutes, checking a few times to be sure they are not burning. After 10 minutes check to see if the side touching the sheet are brown, if they are flip over and sprinkle with salt, I prefer garlic salt. Place the sheet back in the oven and cook another 10 minutes, checking to be sure they do not burn. Once both sides are brown and the potatoes are tender remove from the oven. It may take more than 20 minutes, just keep you eye on the potatoes.
Saturday, October 10, 2009
Steak Tips Au Poivre
Quick and easy dish for a busy night. Start to finish this recipe took me 20 minutes. The meat was tender and delicious. Next time I think I'd serve this over rice or with buttered noodles but its great on its own. The original recipe calls for 1/2 red wine but I used chicken broth in place of the red wine.
Steak Tips Au Poivre
adapted from Cooks Country April/May 2009
1 1/2 pounds steak tips, cut into 2 inch chunks
1 tablespoon coarsely ground pepper
salt
1 tablespoon vegetable oil
4 tablespoons unsalted butter
1 shallot, minced
1/2 cup chicken broth
1/2 cup beef broth
1/2 teaspoon minced fresh thyme
Pat steak tips dry with paper towels. Rub all over with pepper and season with salt. Heat oil in large skillet over medium-high heat until just smoking. Cook steak tips until browned all over and cooked to desired doneness, 6 to 10 minutes. Transfer to plate and tent with foil.
Add 1 tablespoon butter and shallot to empty skillet and cook until softened, about one minute. Add both broths and thyme to skillet. Simmer, scraping up any browned bits, until slightly thickened, 5 to 7 minutes. Off heat, whisk in any accumulated steak juice and remaining butter and season with salt. Spoon sauce over steaks. Serve.
Thursday, October 8, 2009
Egg Harbor Bread
This loaf has surpassed the The First Loaf as my favorite bread I've made so far. The crust was perfect, not too crunchy yet not too soft. The inside was soft and delicious. The bread worked well for sandwiches, toast, and just plain eating. The bread was soft and fluffy. Trust me you'll love this loaf of bread. It really was not complicated to make it just takes some time.
Egg Harbor Bread
Bernard Clayton's New Complete Book of Breads
3 tablespoons sugar
1 tablespoon salt
2 1/2 cups hot water (120-130 degrees)
2 tablespoons butter, room temperature
5 to 6 cups bread flour, approximately
2 packages dry yeast
1 egg, beaten, mixed with 1 tablespoon milk
2 medium loaf pans, greased
In a bowl dissolve sugar and salt in the hot water. Stir in the butter and set aside.
Measure 3 cups flour into the mixer bowl and add the yeast. Blend. Slowly pour in the liquid, using the mixer flat beater. Beat for 2 minutes.
Add flour 1/2 cup at a time. Attach the dough hook and add the flour to form a soft mass.
Add flour if necessary to make a soft, elastic ball that will form around the revolving dough hook and, at the same time, clean the sides of the bowl. Knead for 10 minutes.
The dough has 5 risings before it is made into loaves-the first time for 30 minutes, and 15 minutes each for the remaining 4.
Place the dough in a greased bowl, cover with plastic wrap, and set aside until dough doubles in volume, about 30 minutes.
Turn back the plastic cover and punch down the dough with extended fingers. Turn the dough over. Replace the plastic wrap and set aside for 15 minutes.
At 15 minute intervals, punch down the dough 3 more times.
Turn the dough from the bowl and allow it to rest for 4 or 5 minutes before dividing into 2 pieces.
Shape each piece into a ball. Flatten with the palm into an oblong roughly the length of the loaf pan. Fold lengthwise, pinch the seam together, tuck in the ends, and drop into the prepared pans. Press down with the hand to force the dough into the corners.
Cover the pans with greased wax or parchment paper and put aside until almost triple in volume. The dough should rise 1 1/2 inches to 2 inches above the rim of the tin in about 50 minutes.
Preheat the oven to 400 degrees about 15 minutes before baking.
Brush the loaves with the egg-milk wash, and place the pans on the middle or lower shelf of the oven. Bake until the loaves are a golden brown, 30 to 40 minutes, and test done when rapped on the bottom crust with a forefinger. For a deeper overall brown, remove from the pans and return to the oven for an additional 10 minutes.
Remove from oven and allow to cool on a metal rack before slicing.
Wednesday, October 7, 2009
Perfect Roasted Chicken
This chicken left the house smelling quite tasty. The skin browned up perfectly and the chicken was very tender. Prep time was minimal and the actual cooking time in the oven was the longest part of this dish. I did flip the chicken twice while cooking only because I wanted every side to be perfectly brown. No need to flip if it does not matter to you.
Perfect Roasted Chicken
First Step:
Melt 1 tablespoon butter. Combine with one garlic clove, minced, and 1 tablespoon honey. Salt and pepper to your tastes. Rub this into the actual chicken by lifting part of the skin to get to the meat. You can skip this step if you desire but it really does add some extra flavor to the chicken.
Second Step:
Melt 2 tablespoons butter. Add 1/4 teaspoon salt and 1/8 teaspoon pepper. Baste the entire outside of the chicken with the mixture.
Third Step:
Melt 2 tablespoons butter. Add 3 tablespoons honey and 1/4 cup soy sauce. Baste the outside of the chicken again. You can save some of this to bast throughout the cooking if you'd like but I just basted it all at once.
Fourth Step:
Cook at 350 degrees for one hour. Check the internal temperature by sticking a meat thermometer into the thickest part of the leg. It should register at least 165 degrees Fahrenheit. If you don’t have a meat thermometer, an alternate way to check for doneness is to cut through the skin between the leg and the breast. If the juices that run out are clear rather than cloudy, the chicken’s ready.
Tuesday, October 6, 2009
Halloween Treats Part III
These cupcakes were very cute. I used a sugar bat but if your crafty enough to free hand a bat with black gel frosting that would be even better. I used red gel frosting for the two bite marks. I realized after making these that I should have poked holes with a toothpick and the put the drops of red frosting on top so it would look more like a bite mark. I made a devil's food chocolate cake recipe for the cupcakes but you could use any flavor. I think red velvet cake would make for an eye catching sight. I'll post the recipe later for the devil's food cake but if you wanted you could use a boxed cake mix. I used an easy to make frosting for the cupcakes but again if you wanted to you could use a canned frosting.
Easy Icing
1/2 cup butter
1 teaspoon vanilla extract
1/2 teaspoon almond extract
1/2 teaspoon salt
4 cups confectioners sugar
Beat the butter, vanilla, almond, and salt in a large bowl, with an electric mixer for 30 seconds. Slowly add 2 cups sugar, beating well. Beat in 2 tablespoons water. Slowly add the remaining 2 cups sugar; add 1 to 3 tablespoons more water, as needed, beating to a spreadable consistency.
Monday, October 5, 2009
Easy Pork Chops with Mustard Sage Sauce
A quick and easy to make dish for those busy nights. These pork chops had loads of flavor even without the sauce and can be made without the sauce. The sauce though is a nice touch and really dresses up the pork. Starting time to finishing time on these was about 25 minutes.
Easy Pork Chops with Mustard Sage Sauce
The New Best Recipe cookbook
4 bone-in or center cut pork chops, 1/2 inch to 3/4 inch thick, patted dry with paper towels and scored on outer layer of fat
1 teaspoon vegetable oil
salt and ground black pepper
1/2 teaspoon sugar
If using an electric stove, turn the burner to medium heat, if using a gas stove you can wait until you prepped the meat. Rub both sides of each chop with 1/8 teaspoon of the oil and sprinkle salt and pepper to taste. Sprinkle the meat portion on one side of each chop evenly with 1/8 teaspoon of the sugar, avoiding the bone.
Place the chops sugared side down in a non-stick 12 inch skillet, positioning the chops so that the ribs point to the center of the pan. Using your hands, press the meat on each chop into the pan. Set the skillet over medium heat; cook until lightly browned 4 to 9 minutes (the pork chops should be sizzling after 2 minutes). Using tongs, flip the chops, positioning them in the same manner, with the ribs pointing to the center of the skillet. Cover the skillet, reduce the heat to low, and cook until the center of each chop registers 140 to 145 degrees on an instant read thermometer, 3 to 6 minutes; the chops will barely brown on the second side. Transfer the chops to a platter, tent loosely with foil, and let rest for 5 minutes. If you don't want the mustard sage sauce end here.
After transferring the chops to a platter pour the pan juices in the skillet into a small bowl and reserve. While the chops rest, add 1 teaspoon vegetable oil and 1 medium garlic clove, minced, to the now empty skillet; set the skillet over medium high heat and cook until fragrant, about 30 seconds. Add 1/4 cup low sodium chicken broth; increase the heat to high and simmer until reduced to about 2 tablespoons, about 3 minutes. Add the pork chop juices to the skillet. Off the heat, whisk in 1 tablespoon Dijon mustard and 3 tablespoons cold unsalted butter until melted and combined. Stir in 1 teaspoon fresh sage leaves and adjust the seasonings with salt and pepper to taste. Spoon the sauce over the chops and serve immediately.
Sunday, October 4, 2009
Pumpkin Cinnamon Rolls
These were some of the best rolls I have ever tasted. The pumpkin flavoring took the cinnamon rolls over the top. If you love pumpkin bread or pumpkin pie your going to love these rolls. The glaze was just sugar, milk and butter but I think a cream cheese frosting would have totally sent these rolls into heaven. You won't be disappointed with these rolls. The original recipe calls for dried cranberries and crystallized ginger. I can't wait to try those in the rolls.
Pumpkin Cinnamon Rolls
adapted slightly from King Arthur Flour
1 cup canned pumpkin or squash
2 large eggs
2 tablespoons to 1/4 cup lukewarm water (adjust to your climate, wet needs less dry needs more)
1/4 cup soft butter
2 1/2 cups All-Purpose Flour
1 3/4 cups Whole Wheat Flour
1/4 cup nonfat dry milk
1 teaspoon ground cinnamon
1/2 teaspoon ground ginger
1/4 teaspoon ground cloves
3 tablespoons brown sugar, light or dark
1 1/2 teaspoons salt
2 teaspoons instant yeast
Combine all ingredients in bowl. Mix to combine. Knead till smooth, sticky is okay, your looking for it to hold its shape.
Place the dough in a lightly greased bowl or other container. Cover, and let rise for 1 1/2 hours, until it’s puffy, though not necessarily doubled in bulk.
Gently deflate the dough, and transfer it to a lightly greased work surface. Roll the dough into a 14” x 22” rectangle. It’ll be very thin. Don’t stress if you can’t make it exactly 14” x 22”.
3 tablespoons melted butter
3/4 cup sugar
1 tablespoon cinnamon
Spread the melted butter over the rolled dough. Combine sugar and cinnamon and the sprinkle mixture over the buttered dough. Leave one edge clean. Starting with the end with filling, roll the dough into a log. Seal it closed. Next, you’re going to cut it into 9 rolls. It helps to use a ruler and measure the entire log, divide by 9, then actually make slight cuts, as a guide. A serrated knife is the easiest way to cut this dough. If things start getting too sticky, rinse the knife in hot water (don’t dry it), and continue. There you have it: 9 fat rolls.
Lay the rolls in a lightly greased 9” square pan; the pan needs to be at least 2” deep. Flatten them with your fingers, so they’re fairly tightly packed. Then cover, and let them rise for 1 hour, or until they look puffy – like this. Towards the end of the rising time, preheat the oven to 375°F. Bake the rolls for 25 to 30 minutes, until they’re lightly browned and feel set.
Remove them from the oven, and set them on a rack. Turn them out of the pan, and allow them to cool for about 15 minutes. Towards the end of the cooling time, make the glaze.
Combine the following:
1 cup confectioners’ sugar
1 tablespoon butter
1 1/2 tablespoons milk, or enough to make a “drizzlable” glaze
Saturday, October 3, 2009
Pasta and Fresh Tomato Sauce with Garlic and Basil
I needed a quick tomato sauce recipe the other night and this recipe fit the bill. An added bonus was it helped use some of the fresh tomatoes I have scattered around the house. Start to finish I'd say this dish took me about 20 minutes to make and it had great taste. I'd recommend using a tube type pasta since the sauce is chunky but if you'd rather use spaghetti noodles run the sauce through the food processor.
Pasta and Fresh Tomato Sauce with Garlic and Basil
The New Best Recipe cookbook
3 tablespoons extra-virgin olive oil
2 medium garlic cloves, minced or pressed through a garlic press
2 pounds ripe tomatoes, cored, peeled, seeded, and cut into 1/2 inch pieces
2 tablespoons chopped fresh basil leaves
salt
1 pound pasta
Bring 4 quarts of water to a rolling boil in a large pot.
Meanwhile, heat 2 tablespoons oil and the garlic in a medium skillet over medium heat until the garlic is fragrant but not browned, about 2 minutes. Stir in tomatoes; increase the heat to medium-high and cook until any liquid given off by the tomatoes evaporates and the tomato pieces lose their shape to form a chunky sauce, about 10 minutes. Stir in the basil and salt to taste; cover to keep warm.
Add 1 tablespoon salt and the pasta to the boiling water and stir to separate the noodles. Cook until the pasta is al dente. Reserve 1/4 cup pasta cooking water and drain the pasta. Transfer the drained pasta to the cooking pot. Add the reserved pasta cooking water, tomato sauce, and remaining 1 tablespoon oil; toss well to combine. Serve immediately.
Friday, October 2, 2009
Soft Bread Sticks
These were among the bread sticks I have ever made. They were soft and chewy. The recipe comes from the makers of my favorite flour, King Arthur Flour. I seldom buy another brand of flour as I really like their flour. They also have some great cookbooks on baking. I have never tried a recipe of theirs that we did not like. I would say they are the experts in flour. Yes King Arthur flour is more expensive than other brands you can find in the store but it's worth the extra money.
Soft Bread Sticks
King Arthur Flour
1 1/2 cups lukewarm water
3 tablespoons olive oil, plus additional for drizzling
1 1/4 teaspoons salt
3 1/2 cups King Arthur Unbleached All-Purpose Flour
1 tablespoon instant yeast
4 teaspoons Pizza Dough Flavor, optional
Pizza seasoning or Italian seasoning, to sprinkle on top
1) Lightly grease an 18" x 13" pan (half sheet pan), and drizzle 1 to 2 tablespoons olive oil in the bottom.
2) Combine all of the ingredients, and beat at high speed with an electric mixer for 60 seconds.
3) Scoop the sticky batter into the prepared pan, spreading it nearly to the edges. Oiling your fingers helps with the job.
4) Use a rolling pizza wheel or knife to score the dough in 3/4" to 1" wide crosswise strips, to make 13"-long strips. Score the dough once lengthwise, so that you now have 6 1/2"-long strips. Cover the pan, and let the dough rise at room temperature for 60 minutes, till it's become puffy.
5) While the dough is rising, preheat the oven to 375°F.
6) Drizzle the dough lightly with olive oil, and sprinkle with pizza seasoning, and/or the dried herbs of your choice, if desired.
7) Bake the bread till it's a very light golden brown, about 25 minutes.
8) Remove it from the oven, and carefully lift it out of the pan onto a rack.
9) As soon as you can handle it, cut the dough along the score lines. A pair of scissors works well here.
10) Place the bread sticks back on their baking pan, on edge. You can put them close together. Return them to the oven, and bake for 5 minutes (for soft bread sticks), or 10 minutes (for bread sticks that can stand up to a stiffer dip).
11) Remove them from the oven, and serve warm, or at room temperature.
Yield: about 3 dozen bread sticks.
Thursday, October 1, 2009
Dressed Up French Dip
I usually make a French dip as a quick and easy dinner. Sometimes though I love to make a dressed up version or a grown up version. While this one requires a little more time most of it is in the cooking of the meat. You can choose to cook your meat in the crockpot if you desire but I prefer mine in the oven. If your using your crockpot brown your meat and then cook on high for 6 hours or low for 8 hours.
Dressed Up French Dip
3-4 lb chuck roast
Brown the roast on all sides. Place in a dutch oven with about 2 cups of water and place in a 325 degree oven, covered with foil. Cook 3-4 hours or tender. Check for water and don't let it run dry.
2 medium onions, sliced thin
1 pound fresh mushrooms, sliced or 2 4 ounce cans of mushrooms
3 tablespoons butter
Melt butter in pan. Add onions and mushrooms. Cook until a golden brown color. Stir occasionally. Add salt and pepper to taste.
After roast is done shred the beef into bite size pieces. Cover with foil and make the au jus sauce. You can you a packaged aujus sauce with the drippings or just water or you can make your own. I prefer to make my own.
1 (10-1/2 ounce) can French Onion soup
1 (10-1/2 ounce) can Beef Broth
1 can cold water
1/2 teaspoon white sugar
2 teaspoons Worcestershire sauce
1/8 teaspoon salt
Bring ingredients to a boil in saucepan; serve hot.
Next assemble the sandwich. I like to pile the meat onto my roll or bread, I used my Cuban bread for this recipe in the picture, and top with the cooked onions and mushrooms. I also like to put Gruyère cheese on top and melt the cheese under the broiler. Serve with the aujus sauce and enjoy.