Monday, January 31, 2011

Neo-Neopolitan Pizza Dough

I love the idea of homemade pizza but honestly it's been hard finding a really good dough recipe. I have posted several different recipes on here in the past and yes they will make a decent dough. However I think I have finally stumbled onto what I'd consider one of the best doughs ever. An added bonus you can freeze the dough for future use. Mixing the dough was simple and easy and it requires only a few ingredients. You do need to plan ahead since it needs an overnight rest in the fridge. The dough was crisp yet chewy. I made three different types, pan pizza (which requires a longer cooking time then listed in the recipe), pizza done on a baking stone, and finally I used a cooking sheet. My favorite was on the baking stone followed by the cooking sheet. The pan pizza took forever to cook all the way through and the bottom was burned. I think my problem was I should have used less dough for the pan pizza. I also made bread sticks with the dough and they were great too.

Neo-Neopolitan Pizza DoughPeter Reinhart's Artisan Breads Every Day

5 1/3 cups (24 oz./680 g) unbleached bread flour
2 teaspoons (0.5 oz./14 g) salt or 1 tablespoon coarse kosher salt
1 teaspoon (0.11 oz./3 g) instant yeast
2 tablespoons (1 oz./ 28.5 g) sugar, or 1 1/2 tablespoons honey
2 cups plus 2 tablespoons (17 oz./ 482 g) water, at room temperature
2 tablespoons (1 oz./28.5 g) olive oil

Combine all ingredients in a mixing bowl. Using a mixer, use the paddle attachment and mix on the lowest speed for one minute. The dough should be coarse and slightly sticky. Let the dough rest for 5 minutes to fully hydrate.
Switch to the dough hook and mix on medium low speed for 2 to 3 minutes, until the dough is smoother but still soft, supple, and somewhere between tacky and sticky.
Spread 1 teaspoon of olive oil on a work surface, then use a bowl scraper to transfer dough to the oiled surface. Rub your hands with the oil on the work surface, knead the dough about 3-4 times then shape into a ball. (Note: Peter Reinhart has a different technique but I went with this simple one when I did my dough.) Divide the ball into 5 equal pieces, each weighing 8 ounces (227 g). Form each piece into a ball, then place each into a separate sandwich size freezer bag misted with spray oil. Seal the bag and refrigerate overnight or up to 4 days, or in the freezer for several months (take out at least one day before you want to make your pizza and store in the fridge).

Baking day:
About 90 minutes before you plan to bake the pizzas, place the desired number of dough balls on a lightly oiled surface. With oiled hands, stretch and round each piece into a tight ball, then place them on a pan that's been lightly oiled (preferably with olive oil). Loosely cover with plastic wrap to rest at room temperature until ready to bake.
About 1 hour before baking the pizzas, preheat the oven and baking stone as high as the oven will go. If your not using a pizza stone, assemble the pizzas on baking sheets, covered with parchment or oiled with olive oil, which is what I did. (Note: I did not preheat my other pans that I used.)

Assemble and bake:
Put about 1 cup flour in a bowl. Use some of it to dust the work surface, and your hands. Put one of the dough balls in the flour to coat the bottom. Transfer to the work surface and gently tap it down with your fingers to form a disk. Slide the backs of your hands under the dough, then lift it and begin to rotate it, using your thumbs to coax the edges of the dough into a larger circle. Don't stretch the dough with the backs of your hands or your knuckles, let your thumbs do all the work. If the dough starts to resist or shrink back, set it on the floured surface and let it rest for a minute or two. Move onto another ball. Continue working the dough and resting, as needed until it is about 10 to 12 inches in diameter. It should be thicker at the edges than in the center and the center should be thin but not paper thin. If the dough rips, you can try to patch it or you can form it back into a ball, move on to another dough ball, and try again in 15 to 20 minutes. (Note: I had kids helping me and mine were not done perfectly, in fact the kids rolled the dough with rolling pins. Don't stress if it doesn't work with the directions just find a method, like the rolling pin, that works for you. No one could tell which one I had done with my hands and which I had rolled.)
When the crust is ready to be topped transfer it to the cooking pan. Place flour on the stone or oil your pans. Top the pizza as desired and slide it into the oven.
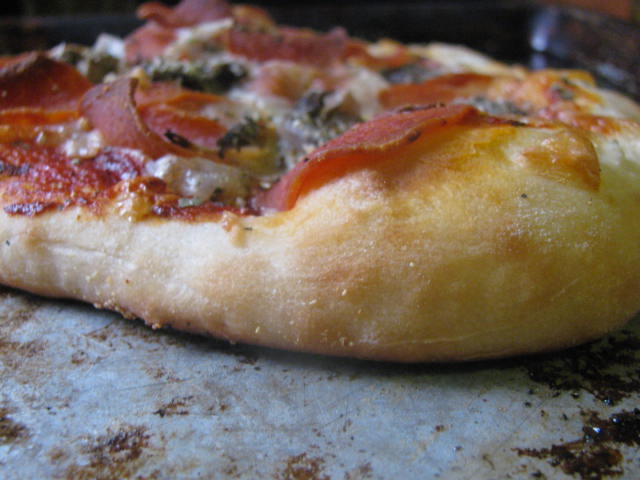
Bake for about 4 minutes, then turn the pan around. It can take another 5 to 7 minutes for the pizza to fully cook. The edges should puff up and be a golden brown, perhaps even slightly charred (which adds loads of flavor surprisingly).
Remove pizza, garnish as desired, then let it cool for 1 minute before slicing or serving.

Stumble Upon Toolbar

Saturday, January 29, 2011

No Bake Peanut Butter Crunch Bars

I noticed this recipe and thought was a perfect solution to my desire to have granola bars on hand. I hate coconut and almost all commercially available bars have coconut in them. The thing I really love about this recipe is you can switch ingredients with others and have hundreds of options available. I used cereals that were whole grain but if you could use regular cereal if you'd prefer and still have granola bars that are less sugary then the ones you buy at the store. Also you can leave the nuts out if you want or sub another type. I've made this with cashews, macadamia nuts, and almonds. Sub out the peanut butter for almond butter or hazelnut butter. Same thing for the dried fruit. I've used pretty much every type out there and it still tastes great. Plus these are easy to make for something that tastes much better than store bought bars.

No Bake Peanut Butter Crunch Bars
Women's Day Magazine Sept. 2010

2 cups slightly crushed whole grain flake cereal
2 cups whole grain puffed rice cereal
1 cup dried fruit of your choice (cranberry is what the original recipe calls for)
1/2 cup unsalted nuts of your choice (cocktail nuts is what the original recipe calls for)
1/2 cup natural peanut butter (or any butter of your choice, the original recipe calls for reduced fat peanut butter but I much prefer the more healthy natural kind)
1/2 cup packed light brown sugar
1/2 cup honey
1 Tablespoon unsalted butter

Line a 13 by 9 inch baking pan with nonstick foil (let the foil extend about 2 inches above pan at both ends).
Mix cereals, fruit, and nuts in a large bowl.
Mix peanut butter, sugar, honey and butter in 2 qt. saucepan. Bring to a boil over medium high heat, stirring constantly; simmer for 1 minute.
Immediately stir into cereal mixture tossing to evenly coat. Coat hands with cooking spray, then use them to spread and press the mixture in prepared pan.  Chill until firm, about one hour.
Holding foil by ends, lift from pan onto a cutting board. Carefully cut lengthwise in 4 strips and then cut each strip in 6; remove foil.

Stumble Upon Toolbar

Friday, January 28, 2011

Broccoli with Cheese Sauce

I love broccoli with cheese. I don't think I've ever passed up the dish or the soup. There is just something about it that draws me to it. However I usually have or are served a mixture of glop with cheese when it comes to broccoli with cheese sauce. The frozen versions are not worth purchasing even if they are free. Well lucky for me Cook's Country made a dish that far exceeds my expectations in broccoli with cheese sauce. An added bonus is it was really quite easy to make. Yes it takes longer than the frozen version but the taste is so far superior I don't think you could ever eat the frozen version again.

Broccoli with Cheese Sauce
Cook's Country Magazine Feb./March 2011

2 pounds broccoli, florets cut into 1 inch pieces, stems peeled and cut into 1/2 inch pieces
2 tablespoons vegetable oil
salt and pepper
1 tablespoon unsalted butter
4 teaspoons all purpose flour
1/4 teaspoon dry mustard
1/8 teaspoon cayenne pepper
1 cup half and half
1/2 cup water
1/2 cup shredded Monterey Jack cheese
1/2 cup sharp cheddar cheese
1/4 cup grated Parmesan cheese

Adjust oven rack to lower middle position, place rimmed baking sheet on rack, and heat oven to 450 degrees.
After 15 minutes, toss broccoli, oil, 3/4 teaspoon salt and 1/4 teaspoon pepper in a large bowl. Arrange broccoli in single layer on hot baking sheet. Bake until spotty brown, 15 to 18 minutes, stirring halfway through cooking.
Meanwhile, melt butter in medium saucepan over medium heat. Add flour, mustard, and cayenne and cook, stirring constantly, until golden and fragrant, about 1 minute. Slowly whisk in half and half and water and bring to a boil. Reduce heat to medium low and simmer until slightly thickened, 8 to 10 minutes. Off heat, whisk in Monterey Jack and cheddar, until smooth. Stir in Parmesan until smooth. Season with salt and pepper. Serve sauce over broccoli.

Stumble Upon Toolbar

Wednesday, January 26, 2011

Weeknight Chicken

If your looking for a simple baked chicken dish for busy nights look no further. This chicken dish was simple to make with little hands on time and tasted liked you spent hours cooking it. Don't be tempted to use boneless skinless chicken on this dish as, trust me, you need the skin and bones. I did not have fresh thyme on hand so I use fresh parsley, which was fine by me as I'm not a huge fan of thyme. The sauce you make at the end puts the finishing touch on a simple and easy to make dinner. Much better than a frozen dinner or even take out.

Weeknight Chicken
Cook's Country March 2011

1 cup low sodium chicken broth
1 1/2 teaspoons corn starch
1 cup white wine (I used chicken broth the first time and white wine the second, I much prefer it with the wine but it tastes fine with extra chicken broth)
4 garlic cloves, peeled and smashed
2 teaspoons minced fresh thyme (I used parsley)
3 pounds bone in skin on chicken pieces
salt and pepper
1 tablespoon vegetable oil
2 tablespoons unsalted butter

Adjust oven rack to middle position and heat oven to 450 degrees. Whisk 2 tablespoons broth and corn starch in small bowl until no lumps remain; reserve. Combine remaining broth, wine, garlic, and thyme in large measuring cup.

Pat chicken dry with paper towels and season with 1/2 teaspoon salt and 1/4 teaspoon pepper. Heat oil in large oven safe skillet over medium high heat until just smoking. Cook chicken, skin side down, until well browned, 6 to 10 minutes. Flip and cook until lightly browned on second side, about 2 minutes.

Slowly pour broth mixture into skillet and bring to a boil. Transfer skillet to oven and roast until white meat registers 160 degrees and dark meat registers 175 degrees, 12 to 18 minutes. Transfer chicken to platter and tent with aluminum foil. Discard garlic.

Pour pan juices into liquid measuring cup; skim and discard fat. Return 1 1/2 cups defatted pan juices to now empty skillet and bring to a boil over medium high heat. Reduce heat to medium low and simmer until sauce is reduced to 1 cup, 5 to 7 minutes. Add reserved cornstarch mixture and simmer until slightly thickened, about 2 minutes. Off heat, whisk in butter. Season with salt and pepper. Serve, passing sauce at table.

Stumble Upon Toolbar

Saturday, January 22, 2011

Bacon Pierogi Bake and Winner of the Giveaway

My first memories of pierogi's is at my aunt's house in Pennsylvania. I don't remember how old I was but they were mighty tasty. A few years ago I discovered they had frozen pierogi's and although they were no where as good as my aunt's it helped with the craving I've had for them. I noticed this recipe in a Cooking Light magazine and decided to give it a try. The dish really helps to improve the taste of frozen pierogi's. It's a really nice combination of flavors.  The cream cheese blended well with the cheddar cheese into a delightful sauce. The original recipe calls for tomatoes but I'm so not a fan of grocery store tomatoes at this time of year so I left them off.

The winner of the Pickapeppa Sauce is Melanie.  Email me at n_baron@msn.com and I'll get a bottle on it's way shortly.

Bacon Pierogi Bake
Cooking Light Magazine December 2010

1  (16-ounce) package frozen potato and onion pierogies (such as Mrs. T's)
Cooking spray
2  center-cut bacon slices, chopped
2  garlic cloves, minced
1/3  cup  (3 ounces) 1/3-less-fat cream cheese
1/2  cup  fat-free, lower-sodium chicken broth
1/2  cup  (2 ounces) shredded sharp cheddar cheese
1/4  cup  thinly diagonally sliced green onions
1/4  cup  chopped seeded plum tomato
1/2  teaspoon  freshly ground black pepper

Preparation

1. Preheat oven to 400°.

2. Arrange the pierogies in an 11 x 7-inch glass baking dish coated with cooking spray. Cook bacon in a saucepan over medium heat until crisp; remove from pan. Set aside.

3. Add garlic to drippings in pan, and cook for 30 seconds, stirring constantly. Add 1/3 cup cream cheese to pan, and cook for 1 minute or until cream cheese begins to melt, stirring frequently. Gradually add chicken broth to pan, stirring with a whisk until smooth. Pour the cream cheese mixture evenly over pierogies. Top evenly with 1/2 cup cheddar cheese. Bake at 400° for 20 minutes or until bubbly and thoroughly heated. Remove from oven, and sprinkle with bacon, green onions, tomato, and pepper.
Nutritional Information

Stumble Upon Toolbar

Sunday, January 16, 2011

Heath Bar Cake

Mel from Mel's Kitchen Cafe posted this Monday.  I called my husband on his way home from the gym to stop and buy the Heath bars so I could make this cake that night.  It sounded that good to me.  And it did taste as good as it looked on Mel's blog.  Oh it was one of the best tasting cakes I've ever made or eaten.  My favorite parts were the edges of the cake but honestly all parts of this cake were great.  I used six candy bars since I love Heath bars.  Also I had a little bit of caramel sauce leftover from banana splits the night before so I threw some of that on top before baking.  Overall it was a great cake and one that I'm drooling just thinking about it again.

Also don't forget to enter into the contest I am having here.


Heath Bar Cake
Mel at Mel's Kitchen Cafe


1 cup packed light brown sugar
1/2 cup granulated sugar
2 cups flour
8 tablespoons (1 stick) butter, softened
1 cup buttermilk
1 large egg
1 teaspoon vanilla
1 teaspoon baking soda
1/2 teaspoon salt
5-6 (1.4 ounces each) chocolate covered toffee bars (like Heath), chopped
Preheat the oven to 350 degrees and center a rack in the middle of the oven. Lightly grease a 9X13-inch pan and set aside.
In a large bowl, combine the brown sugar, white sugar, flour and butter. Crumble these ingredients together with a pastry blender, whisk or two forks until the mixture is crumbly and coarse. Remove 1/2 cup of the crumbs to a small bowl and set aside. To the large bowl with the remaining crumbs, add the buttermilk, egg, vanilla, baking soda and salt. Mix well.
Pour the batter into the prepared pan, smoothing it to the edges. Sprinkle the top of the cake with the reserved crumbs and chopped Heath bars. Bake for 25-30 minutes until the center is no longer gooey but a toothpick inserted comes out with moist crumbs. The cake may fall slightly in the center leaving the edges raised. No fear! It will still be delicious.

Stumble Upon Toolbar

Tuesday, January 11, 2011

Spinach Artichoke Dip

I love spinach artichoke dip.  I know it's one of those things that you either love or you hate.  Sadly the dish is loaded with fat and calories.  Cooking Light listed a recipe for a lower fat and calorie version of this dish and of course I had to give it a try.  I read through all the comments on this dish and then referred to my favorite recipe from Cook's Country and then combined a little from all three places to make this to die for dip.  Honestly I have to say the dip I served on Christmas day was the best spinach artichoke dip I have ever eaten.  You couldn't tell it was low fat or lower in calories.  I made this dish on Christmas Eve so the flavors combined overnight and I find this to be a crucial step as I made this same dish again for New Years and didn't let it sit in the fridge overnight and it was no were as good.  Also don't forget to enter the giveaway I am having here.

Spinach Artichoke Dip
adapted from Cooking Light Magazine September 2000

2  cups  (8 ounces) shredded part-skim mozzarella cheese, divided
1/2  cup  fat-free sour cream
1/4  cup  (1 ounce) grated fresh Parmesan cheese, divided
1/4  teaspoon  black pepper
3  garlic cloves, crushed
1  (14-ounce) can artichoke hearts, drained and chopped
1  (8-ounce) block 1/3-less-fat cream cheese, softened
1  (8-ounce) block fat-free cream cheese, softened
1/2  (10-ounce) package frozen chopped spinach, thawed, drained, and squeezed dry
1 teaspoon horseradish
about 5 drops of Tabasco sauce
 
Preparation


Combine 1 1/2 cups mozzarella, sour cream, 2 tablespoons Parmesan, and next 8 ingredients (2 tablespoons Parmesan through Tabasco sauce) in a large bowl, and stir until well-blended. Spoon mixture into a 1 1/2-quart baking dish. Sprinkle with 1/2 cup mozzarella and 2 tablespoons Parmesan.
Refrigerate over night or at least 6 hours.
Bake at 350° for 30 minutes or until bubbly and golden brown. Serve with tortilla chips.

Stumble Upon Toolbar

Monday, January 10, 2011

Easy Appetizer and a Giveaway


I'll be very honest here the sauce featured in this dish is either going to be one you like or you don't like.  Pickapeppa Sauce has a very unique flavor that can be a turn off for some.  However if you like Worcestershire sauce you should like this sauce.  The ingredient list is pretty decent for a processed food item: tomatoes, onions, sugar, cane vinegar, mangoes, raisins, garlic, salt, peppers, thyme, and cloves.  I have a southern friend who swears by this stuff and she's the one who told me about this appetizer.  She tells me she uses it in salad dressings, gravies, cheese dishes, and with seafood.  I've only tried it in gravy and in this appetizer.  I've found this in most grocery stores here in Utah so obviously others use this but it was a new find for me.  And now you can have a chance to try this for free.  Leave a comment telling me of any other nifty things you buy in the grocery store and I'll enter you to win a bottle of this sauce.  If your one who wants more entries mention it on your blog and/or facebook and come back here and leave me a comment telling me you did and you'll get an extra entry for every comment you made telling me where you shared it.  The contest runs until midnight January 20th.

Easy Appetizer
Christy Carlsen

1 8 oz. package cream cheese, low fat, non fat, or regular at room temperature
half a bottle of Pickapeppa Sauce

Pour the Pickapeppa sauce over the cream cheese and serve.  Provide pretzels, crackers, or chips to dip into the appetizer. 

Stumble Upon Toolbar

Sunday, January 9, 2011

Vietnamese Pho with Beef

I've been wanting to make this soup for several years.  I probably have hundreds of magazines and cookbooks with the recipe for this dish yet I always had some reason why I didn't make it.  Well I finally gave it a try.  I have to say I like the soup.  It's probably not authentic but for someone who until about 15 years ago wouldn't touch anything that was American cooking I found it pleasantly good.  After smelling the 5 spice powder I had my doubts cause it didn't really smell good. Tip on the 5 spice powder look for it at a local Asian store.  I paid $1.99 for a nice size bottle for it there.  The local grocery store wanted $8.99 for a 2 oz. bottle. Nice thing is the soup didn't taste like the smell of the spice at all.  I'll admit I chickened out on using the fish sauce.  I bought the fish sauce and planned on using it but after opening the container I just couldn't do it.  If you know me you know I don't like fish or things that smell like fish.  I used soy sauce and my sweet husband swears you couldn't tell I had used soy sauce.   Overall this was a very fast dish to put together and made it to the table in less than 25 minutes.  Not bad for a night you really want take out.

Vietnamese Pho with Beef
The Best Simple Recipes America's Test Kitchen

8 cups low sodium chicken broth
1 2 inch piece fresh ginger, peeled, halved lengthwise, and smashed
3 2 1/2 inch strips zest and 1 tablespoon juice from one lime
1/2 teaspoon Chinese five spice powder
8 ounces thick rice noodles
1 pound sirloin steak tips, sliced thin
3 tablespoons fish sauce (note I used low sodium soy sauce)
1 teaspoon Asian chili garlic sauce
4 scallions, sliced thin
1/4 cup fresh whole cilantro leaves

Bring broth, ginger, lime zest, and five spice powder to boil in dutch oven over medium high heat.  Add noodles and cook until nearly tender, about 5 minutes.  Stir in beef and simmer until cooked through and noodles are completely tender, about 2 minutes.

Off heat, stir in fish (soy) sauce, chili garlic sauce, and lime juice.  Remove ginger and zest with slotted spoon.  Stir in scallions and cilantro.  Serves 4.

Stumble Upon Toolbar

Saturday, January 8, 2011

Parmesan Pork Cutlets

This was a very simple and easy dish to make.  An added bonus is that it tasted really good.  The coating was crunchy and the pork was tender and moist.  It also has only a handful of ingredients that are quite easy to keep on hand for those nights when takeout is calling your name.  The only thing I will change in the future is adding some garlic powder since I love the flavor of pork with garlic.  I also think these pork cutlets would be great for a pork sandwich.  I love making little sandwiches out of cutlets and these would be very tasty as a sandwich.

Parmesan Pork Cutlets
The Best Simple Recipes from America's Test Kitchen

1/ 2 cup olive oil
1/2 cup all purpose flour
2 large eggs
1 cup panko bread crumbs
1 cup shredded Parmesan cheese, use the large holes on the grater
4 thin cut boneless pork cutlets (about 12 ounces), you can also use pork tenderloin and cut thin and pound into a cutler

Place flour in a shallow dish.  Beat eggs in a second shallow dish.  Combine panko, Parmesan, and 1/2 teaspoon pepper in third shallow dish.  Pat pork dry with paper towels and season with salt and pepper.

One at a time, dredge cutlets in flour, dip in egg, and coat with bread crumb mixture, pressing to adhere.

Heat 1/4 cup olive oil in large nonstick skillet over medium heat until shimmering.  Fry 2 cutlets until deep golden and crisp, about 3 minutes on each side.  Drain on paper towel lined plate.  Wipe out skillet and repeat with remaining oil and cutlets.  Serves 4.

Stumble Upon Toolbar

Wednesday, January 5, 2011

Pizza Twists

The latest King Arthur Flour catalog came and these were featured in the catalog.  Honestly if you don't get this catalog you need to sign up for it not only do they have neat stuff to buy that there are usually several recipes included.  I've never made anything from King Arthur that hasn't turned out good.  I decided however that I wanted to serve these as a meal so I added some ingredients.  I chopped up pepperoni into small chunks and microwaved them for a minute to cut out some of the fat.  I also chopped up mushrooms, green peppers, and onions.  Overall the flavor was amazing.  So without making you wait any longer here is the recipe with my changes, click on the link to see the original recipe.

Pizza Twists
King Arthur Flour

3/4 cup lukewarm water (about 110°F)
2 tablespoons olive oil
1 tablespoon Pizza Dough Flavor, optional
1 teaspoon instant yeast
1 3/4 cups Unbleached All-Purpose Flour
1/3 cup Unbleached All-Purpose Flour

Filling

1/4 cup shredded blend of cheese, I used asiago and parmesan
1 teaspoon pizza seasoning or the dried herbs of your choice
1 tablespoon melted butter
1 tablespoon water
1/2 cup finely shredded mozzarella or pizza-blend cheese
1 tablespoon olive oil or garlic oil
about 4 ounces of pepperoni chopped into chunks
2 medium size white mushrooms chopped
1/4 of a green pepper, chopped
about 1/4 of a yellow onion, chopped

1) Mix, then knead the dough ingredients to make a smooth, elastic dough, about 5 to 10 minutes.

2) Place the dough in a lightly greased bowl, cover it with lightly greased plastic wrap, and let it rise until it's doubled in bulk, about 1 hour.

3) Make the filling by stirring together the cheese powder, Pizza Seasoning, melted butter, and water.

4) Grease a baking sheet, or line it with parchment.

5) Turn the dough out onto a lightly greased work surface. Pat, then roll it into a 20" x 10" rectangle.

6) Spread the dough with the filling, leaving 1/2" free of filling along the long edges. Sprinkle with the shredded cheese.

7) Fold the dough in half so the long sides (free of filling) meet. Press together by rolling over the dough with a rolling pin. Cut into twenty 1" slices.

8) Place the slices about 1" apart on the prepared pan, twisting them as you lay them down. Brush with olive oil or garlic oil.

9) Cover and let rise for about 1 hour, or until puffy. Towards the end of the rising time, preheat the oven to 375°F.

10) Bake the twists for 20 to 25 minutes, or until they're light golden brown. Remove them from the oven, and serve warm with pizza sauce or marinara, if desired.

Yield: 20 twists.

Stumble Upon Toolbar

Monday, January 3, 2011

Ham Salad

So you made the Dr. Pepper ham from yesterday's post and you have leftovers.  Well here is a very easy recipe to use up the leftover ham.  It took about 8 minutes from start to finish to make this dish and it served dh and I lunch for three days.  The salad isn't loaded with mayo and it has a nice combination of flavors.  Add some spinach or arguala to your roll or bread and it makes a fairly nice lunch that you can tote with you or have on a Saturday afternoon.  If your like me and not really a fan of ham salad, having only had the mayo heavy ones at the deli or those really gross canned ones in the past, you really need to give this ham salad a try.  Trust me you won't be disappointed.

 Ham Salad
Cook's Country April/May 2010 magazine

1 1/2 cups diced ham, rind removed
1/4 cup mayonnaise
3 tablespoons sweet pickle relish
1 tablespoon whole grain mustard
1/2 teaspoon black pepper

Pulse ham in bowl of food processor until coarsely chopped, about ten one second pulses.

Combine mayonnaise, relish, mustard, and pepper in a medium bowl.  Add ham and mix.  Serve chilled.

Stumble Upon Toolbar

Sunday, January 2, 2011

Dr. Pepper Glazed Ham

This ham is amongst the best I've ever made.  I love cooking the ham in the oven bag as it keeps it moist and it doesn't get all dried out.  The glaze is really easy to make and put together plus it tastes loads better than the sugary glaze that comes with the ham.  The Dr. Pepper provides a fruit taste but the orange juice and mustard keep it from being overly fruity and sweet.  A great recipe to try at Christmas or Easter and I promise you won't be disappointed.

Dr. Pepper Glazed Ham
Cook's County Best Lost Suppers Cookbook

1 7-10 pound spiral sliced bone in half ham, preferably shank end
1 plastic oven bag
3/4 cup packed light brown sugar
1/2 cup dr. pepper
2 tablespoons orange juice
2 teaspoons dijon mustard

Bring Dr. Pepper, sugar, orange juice and mustard to boil in medium saucepan. Reduce heat to medium-low and simmer until mixture is syrupy and measures 1 1/2 cups, about 8 minutes and let cool.

Remove Ham from packaging and discard plastic disk that covers bone. Place ham in plastic oven bag (or foil), tie bag shut, and trim excess plastic. Set ham cut side down in 13x9 inch baking dish. Cut 4 slits in top of oven bag if used. If using foil, place ham cut side down in baking dish and wrap tightly. Let stand at room temp for 1 1/2 hours.

Adjust oven rack to lowest possible position and heat oven to 250 degrees. Bake ham until center registers about 100 degrees on instant read thermometer, 1 1/2 to 2 1/2 hours, depending on weight of ham.

Remove ham from oven and roll back sides of bag to expose ham. Brush ham liberally with glaze and return to oven briefly until glaze becomes sticky, about 10 minutes. Remove from oven, brush entire ham again with glaze, loosely cover with foil and let rest for 30 to 40 minutes before carving.

Stumble Upon Toolbar