Tuesday, October 20, 2009

Beef and Vegetable Soup plus a Giveaway Winners announced


First the giveaway. I've discovered this really package of tomato paste that is great for those recipes that only call for a teaspoon or tablespoon of tomato paste. You just store in the fridge after opening and its good for a few months. No more opening a can of tomato paste and then forgetting to use the rest of the can. This is made by Amore products and has become a favorite of mine. I hope you'll enjoy using it too. Just leave a comment if you'd like a chance to win one of two packages. If your a follower leave two comments for an extra chance and if your not a follower yet become one and let me know in a separate comment for two chances to win. You have until Friday at 5pm (MST) to enter and winners will be announced Saturday.
Winners are:

he winners of the tomato paste tubes:

Random Integer Generator

Here are your random numbers:

13 6 

Timestamp: 2009-10-24 15:18:57 UTC

Number 6 is Frieda

Number 13 is Charmed

If you'd email your address at n_baron@msn.com I'll get them in the mail next week.


Now on to the soup. This had great flavor and was a favorite amongst everyone in our house. The depth of flavor was unbelievable. This is not a quick soup dish but not as long as some soup recipes. Next time I plan on adding some barely to the soup as I think that would really add to the dish.

Beef and Vegetable Soup
Cooks Country Dec./Jan. 2006

Broth
3 pounds beef blade steaks
salt and pepper
2 tablespoons vegetable oil
1 tablespoon tomato paste
4 cups low sodium chicken broth
4 cups low sodium beef broth
2 cups water
1 garlic head, top third cut off and discarded, loose outer skins removed
2 bay leaves
1/2 teaspoon dried thyme

Soup
1 tablespoon butter
1 medium onion, chopped
2 medium carrots, peeled, halved lengthwise and cut into 1/4 inch half moons
1 (14.5 ounce) can diced tomatoes, drained
salt and pepper
chopped fresh parsley

For the broth
Season blade steaks with salt and pepper. Heat 1 tablespoon oil in dutch oven over medium high heat until shimmering. Add half of steaks and cook until well browned on both sides, about 8 minutes. Set steaks aside on plate. Repeat with remaining tablespoon oil and steaks.

Pour fat from dutch oven and return to medium high heat. Add tomato paste and cook, mashing paste with wooden spoon for 30 seconds. Add chicken broth, beef broth, and water, and scrape browned bits from bottom of pot with wooden spoon. Return steaks and any accumulated juices to pot. Add garlic, bay leaves, and thyme and bring to a simmer, using a wide, shallow spoon to skim off foam or fat that rises to surface. Reduce heat to medium-low and simmer gently until meat is tender, about 2 hours.

Transfer steaks and garlic head to a rimmed plate to cool. Once cool enough to handle shred meat into bite sized pieces, discarding any fat. Using tongs, squeeze garlic cloves into small bowl. Mash with fork until paste forms. Pour broth through fine-mesh strainer. Return shredded beef and garlic paste to broth. Broth can be refrigerated for 3 days or frozen for 2 months.

For the Soup
Melt butter in clean dutch oven over medium heat. Add onion and carrots and cook until onion is softened but not browned, about 5 minutes. Add tomatoes and carrots. Bring to simmer, reduce heat to medium-low, and cook until carrots are tender, about 20 minutes.

To serve, adjust servings with salt and pepper and sprinkle with parsley.

You can add other veggies or replace the veggies listed with others. Just adjust cooking times as needed.

Stumble Upon Toolbar

Monday, October 19, 2009

English Muffin Bread

My dad loves English muffin bread and since he's recovering from surgery I thought make him a batch. This bread really was not hard to make but it was a pain in the butt getting it into the baking pans. The dough is so sticky it does not want to release from anything. Not sure if there is anything you can do about that though. In the picture there are brown streaks which are due to using baking soda in the recipe. The streaks don't change the taste just make it less attractive. You can use baking powder in place of the baking soda if you'd prefer a loaf without the streaks.

English Muffin Bread
Bernard Clayton's New Complete Book of Breads

1 package dry yeast
1/2 cup nonfat dry milk
2 teaspoons salt
4 cups bread flour
2 cups hot water (120-130 degrees)
1/2 teaspoon baking soda dissolved in 1 tablespoon warm water

Grease two small loaf pans.

In a bowl combine the yeast, dry milk, salt and 2 cups flour. Pour in the hot water and stir to blend thoroughly. Stir in additional flour, 1/2 cup at a time, until the batter is thick. Stir the batter for 3 minutes with a flat beater in the mixer. The dough will pull away from the sides of the bowl in thick ribbons.

Cover the bowl with plastic wrap and put in a warm place (80-100 degrees) for about 1 hour, or until the batter has doubled in volume-it will be quite bubbly.

Stir down the batterlike dough and add the dissolved baking soda. Be certain it is well blended. Spoon or pour into the pans, pushing the dough into the corners with a rubber spatula. The pans will be about 2/3rds full.

Lay plastic wrap over the pans and return to a warm place. The dough will rise to the edge of the pans, about 1 hour.

Preheat the oven to 375 degrees 20 minutes before baking.

Bake the loaves for about 1 hour. The loaves will be well browned and pull away from the sides of the pan when done.

Turn the bread out from the pans. Allow to cool on a wire rack before cutting. The loaves can be kept for several months in a 0 degree freezer.

Stumble Upon Toolbar

Saturday, October 17, 2009

Crispy Chicken Wraps


I finally got around to making this delightful little wraps after having the recipe for over a year. This makes a very quick meal if you use leftover chicken or a rotisserie chicken from the store. I used some sauteed chicken breasts to make mine. I originally saw the recipe in an issue of Cook's Country magazine (does this surprise anyone that I made yet another recipe from Cook's Country?) but I used Melanie's version from My Kitchen Cafe. Give this quick dish a try you won't be disappointed.

Crispy Chicken Wraps
Melanie at My Kitchen Cafe

**To prevent the wraps from unrolling during cooking, be sure to start them seam-side down in step 3.

1/3 cup mayonnaise, light or regular
1/4 cup chopped fresh cilantro
3 scallions, sliced very thin
2 celery ribs, chopped fine
2 tablespoons sour cream, light or regular
2 teaspoons hot sauce (this does not make them spicy but adds great flavor!)
1 rotisserie chicken, skin discarded, meat shredded into bite-sized pieces (about 3 cups)
2 cups shredded cheddar cheese
4 (12-inch) flour tortillas

1. Whisk the mayonnaise, cilantro, scallions, celery, sour cream and hot sauce in a large bowl. Add chicken and toss to combine.

2. Sprinkle cheese over tortillas, leaving 1/2-inch border around edges, then arrange chicken mixture down the center of each tortilla. Roll stuffed tortillas, leaving edges open. Spray the tortillas all over with cooking spray.

3. Heat a large non-stick skillet (or griddle) over medium heat for 1 minute. Arrange 2 wraps, seam-side down, in pan and cook until golden brown and crisp, about 2-3 minutes per side. Transfer to a plate and repeat with remaining wraps. Serve.

Stumble Upon Toolbar

Friday, October 16, 2009

Cheddar Garlic Biscuits

I love homemade biscuits. I really can not stomach the taste of the canned biscuits you can buy in the grocery store. However I realize that I don't have the time to make homemade biscuits all the time. This recipe though is really quick to make and pairs well with a lot of dishes. From start to finish it takes about 30 minutes. I did sub evaporated milk for the cream, mainly because I did not have cream on hand and second to cut a few calories.

Cheddar Garlic Biscuits
adapted from Cooks Country Dec./Jan. 2006

2 cups all purpose flour
2 teaspoons sugar
2 teaspoons baking powder
1/2 teaspoon salt
3/4 cup cheddar cheese
2 minced garlic cloves
1 1/2 cups cream or evaporated milk

Adjust oven to upper middle position and heat oven to 425 degrees. Line baking sheet with parchment paper.

Whisk flour, sugar, baking powder, salt and garlic in medium bowl. Stir in 1/2 cup cheese. Add 1 1/4 cups cream and stir with wooden spoon until dough forms, about 30 seconds. Transfer dough from bowl to countertop, leaving dry, floury bits in bowl. In 1 tablespoon increments, add up to 1/4 cup cream to dry bits in bowl, mixing with wooden spoon after each addition, until moistened. Add moistened bits to rest of dough and knead by hand until smooth, about 30 seconds.

Pat dough into 8 inch circle, cut into eight wedges, and place on prepared baking sheet. Bake until just beginning to brown, 7 to 9 minutes. Remove baking sheet from oven, sprinkle 1 1/2 teaspoons remaining cheese on each biscuit, and return to oven, rotating baking sheet from front to back. Bake until golden brown and cheese topping has melted, 7 to 9 minutes. Serve warm.

Stumble Upon Toolbar

Thursday, October 15, 2009

Acorn Squash with Brown Sugar Butter Sauce


Every year we get acorn squash with our CSA and every year I donate it to the food bank or a neighbor or I throw it away. This year I've received three so far and have decided I don't want to throw it away so I searched the internet and my cookbooks for a recipe. Most of the recipes call for you to stuff the squash with rice and sausage which for some reason did not sound too appealing to me. I ended up finding a recipe that made the squash a lot like a loaded sweet potato. I will admit I ended up really liking the squash and will make this again. The flavors blended well together and the squash was tender. As you can tell from the picture I ended up with a nice amount of buttery liquid so you may want to cut back on the butter some if you want to cut some calories. I'm not sure why I had so much liquid when the blog I found the recipe on did not have this problem.

Acorn Squash with Brown Sugar Butter Sauce
Savory Sweet Life

1 acorn squash, cut in half with seeds removed

1/2 cup water

a couple pinches of salt

a couple pinches of nutmeg

a couple pinches of cinnamon

2 – 1 Tablespoon pats of butter

4-6 Tablespoons brown sugar

DIRECTIONS:

Preheat oven on HIGH-Broiler. Pour water in a microwavable casserole dish large enough to accommodate the squash. Place the acorn squash flesh side down in the dish and microwave for 15 minutes. Remove from microwave carefully because the dish will be hot. Remove the acorn squash and transfer to a baking sheet with the flesh side facing up. Place a small pat of butter in each half and rub the entire flesh sided surface. Any remaining butter should be left in the middle of the squash. Sprinkle the squash with salt, nutmeg, and cinnamon. Finally sprinkle between 2-3 Tablespoons of brown sugar around the rim of the squash and allow the remaining sugar to join the butter in the center (This will be your brown sugar sauce). Broil on high heat for 5 minutes. You should seam some the rim of the squash with caramelization. If not, broil for an additional 3 minutes. Remove from heat and enjoy!

**Note: This recipe is not overly sweet or spicy. The sugar and spices merely enhance the wonderful natural flavor of the squash. If you prefer a more sweet and spicy acorn squash just add more according to your liking.

Stumble Upon Toolbar

Wednesday, October 14, 2009

Blue Cheese and Cheddar Scalloped Potatoes

I've had some blue cheese sitting in the fridge for a few weeks and I had been trying to decide what to use it for when Melanie posted this recipe. I really liked how the blue cheese added to the dish. An added bonus was the flavor was there but it was not overpowering. In fact my husband did not notice that I had added blue cheese to the dish until I told him. I also subbed evaporated milk for the cream in this dish and no one noticed. Lately I've been playing with using evaporated milk in place of whipping cream as a way to cut calories in dishes with great success.

Blue Cheese and Cheddar Scalloped Potatoes
Melanie at My Kitchen Cafe

1 tablespoon butter
1 1/4 pounds russet or yukon gold potatoes, peeled and sliced 1/8-inch thick
1/2 medium onion, minced
2 cloves garlic, minced
1 teaspoon dried thyme
1/2 cup chicken broth
1/2 cup heavy cream **I used evaporated milk
1 bay leaf
1 cup grated sharp cheddar cheese
1/4 cup crumbled blue cheese (or more to taste)
Salt and pepper

Preheat the oven to 425 degrees. Heat a large cast iron skillet over medium-high heat. Add the butter. When melted, add the onion, cook for 2-3 minutes until translucent and beginning to lightly brown.

Toss in the garlic and thyme and cook for 30 seconds, until fragrant. Add a pinch of salt and pepper. Dump in the potatoes, chicken broth, cream and bay leaf. Bring to a simmer and then cover, reduce the heat to medium-low and cook for about 10 minutes.

Remove the cover, sprinkle the cheese on top, and place the iron skillet in the oven. Cook for 15 minutes or until the cheese is bubbling and slightly browned. Let rest for 5-10 mintues before serving. Season with salt and pepper to taste.

Stumble Upon Toolbar

Tuesday, October 13, 2009

Simple Sesame Noodles


Seriously I am addicted to these noodles. I had them twice last week and for lunch and dinner yesterday. They take less than 15 minutes to make and they taste great. This recipe does contain a few ingredients that you may not have stocked in your pantry yet but once you try these you'll be keeping them stocked so you can make this simple dish. The best thing about this recipe is you can adapt the seasonings to your taste easily.

Simple Sesame Noodles
Pioneer Woman

12 ounces thin noodles, cooked and drained (angel hair, thin spaghetti, or Asian style)
1/4 cup soy sauce
2 tablespoons sugar
3 to 4 cloves garlic, minced
2 tablespoons rice vinegar
2 to 3 tablespoons pure sesame oil
1/2 teaspoon hot chile oil (more to taste) *** I used the red chili garlic sauce in place of the hot chile oil
4 to 5 tablespoons canola oil
2 tablespoons hot water
3 to 4 green onions, sliced thin

Whisk all ingredients (except noodles and green onions) together in a bowl. Taste and adjust ingredients as needed.
Pour sauce over warm noodles and toss to coat.
Sprinkle with green onions and toss.
Serve in a bowl with chopsticks. Yummy!

Stumble Upon Toolbar

Monday, October 12, 2009

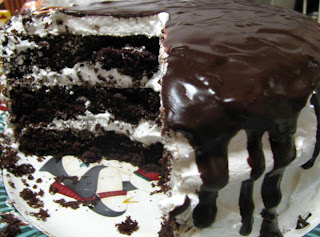
Chocolate Shadow Cake


This was a fun cake to make. To save time you could use a boxed cake mix but I have to tell you making a cake from scratch tastes much better. This would also make a fun cake to serve around Halloween time.

Chocolate Shadow Cake
Cooks Country Oct/Nov 2008

For this cake you will need:
4 large egg whites
3 tablespoons water
1 1/4 cup sugar
1 teaspoon cream of tartar
pinch of salt
1 teaspoon vanilla
3 (8 inch) chocolate cake rounds
4 ounces bittersweet chocolate, chopped
4 tablespoons unsalted butter
2 tablespoons light corn syrup

For the icing:
Whisk egg whites, water, sugar, cream of tartar, and salt in a large heat resistant bowl set over medium saucepan filled with 1/2 inch of barely simmering water (don't let the bowl touch water). With hand held mixer on medium high speed, carefully beat egg white mixture to stiff peaks, 6 to 8 minutes. Remove bowl from heat, add vanilla, and continue to beat until icing is very thick and stiff and cooled to room temperature, about 8 minutes.

To assemble:
Spread 1 cup icing on bottom cake layer. Repeat with second cake layer and additional one cup icing. Top with final cake layer and spread top and sides with remaining icing.

To decorate:
Place chocolate, butter, and corn syrup in large heat resistant bowl set over medium saucepan filled with 1/2 inch of barely simmering water (do not let bowl touch water). Stir until melted and smooth, then remove from heat and let cool 5 minutes. Spoon 1/4 cup chocolate mixture over top of cake and then drizzle remaining glaze along top edge of cake, allowing it to drip about halfway down the sides.

Stumble Upon Toolbar

Sunday, October 11, 2009

Baked Steak Fries

I love making these just to snack on and they are great as a side dish. They don't take a lot of time to make and even the kids gobble these up. These are just as crispy as a fried french fry but much healthier for you.

Preheat oven to 425 degrees.
Spray a cooking sheet with Pam.
Wash and scrub 3-4 potatoes, I prefer red or yukon but russets work too
Cut the potatoes in half. Then cut into slices about 1/4 inch thick. Place on cooking sheet.
Cook for about 10 minutes, checking a few times to be sure they are not burning. After 10 minutes check to see if the side touching the sheet are brown, if they are flip over and sprinkle with salt, I prefer garlic salt. Place the sheet back in the oven and cook another 10 minutes, checking to be sure they do not burn. Once both sides are brown and the potatoes are tender remove from the oven. It may take more than 20 minutes, just keep you eye on the potatoes.

Stumble Upon Toolbar

Saturday, October 10, 2009

Steak Tips Au Poivre


Quick and easy dish for a busy night. Start to finish this recipe took me 20 minutes. The meat was tender and delicious. Next time I think I'd serve this over rice or with buttered noodles but its great on its own. The original recipe calls for 1/2 red wine but I used chicken broth in place of the red wine.

Steak Tips Au Poivre
adapted from Cooks Country April/May 2009

1 1/2 pounds steak tips, cut into 2 inch chunks
1 tablespoon coarsely ground pepper
salt
1 tablespoon vegetable oil
4 tablespoons unsalted butter
1 shallot, minced
1/2 cup chicken broth
1/2 cup beef broth
1/2 teaspoon minced fresh thyme

Pat steak tips dry with paper towels. Rub all over with pepper and season with salt. Heat oil in large skillet over medium-high heat until just smoking. Cook steak tips until browned all over and cooked to desired doneness, 6 to 10 minutes. Transfer to plate and tent with foil.

Add 1 tablespoon butter and shallot to empty skillet and cook until softened, about one minute. Add both broths and thyme to skillet. Simmer, scraping up any browned bits, until slightly thickened, 5 to 7 minutes. Off heat, whisk in any accumulated steak juice and remaining butter and season with salt. Spoon sauce over steaks. Serve.

Stumble Upon Toolbar